
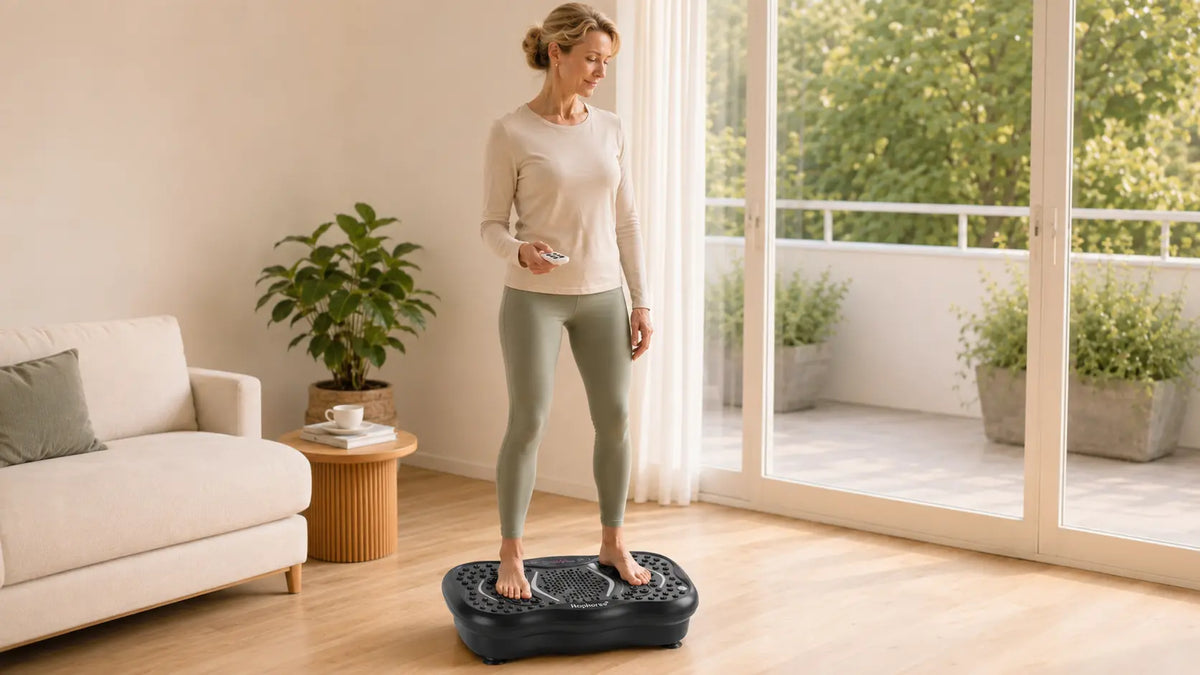
To use a vibration plate, place it on a hard, level floor, stand with both feet secure and your knees slightly bent, and begin with a low, comfortable setting. Start with a short 5–10 minute session. Add simple movements only after you feel stable, and step off only after the platform has completely stopped.
If you own a Hophorse vibration plate, check the manual for your specific model before selecting a speed or preset program. Controls, speed ranges, accessories, and program behavior can vary between models.
How to use a vibration plate in six steps
The safest way to begin is to treat your first session as a setup and posture practice—not a high-intensity workout. Follow these six steps and use your model’s manual whenever its instructions differ.
- Read the manual and check the equipment Confirm the model, supplied accessories, control functions, recommended session length, and safety instructions. Inspect the power cord, platform, remote, and resistance bands before use.
- Place the plate on a hard, level floor Choose a clear area with enough room to step on and off safely. Make sure the base or suction feet sit evenly on a clean, dry surface. Avoid thick carpet or an uneven floor.
- Attach accessories before starting If your model includes resistance bands, connect them only to the designated attachment points. Do not invent attachment points or clip the bands to the standing surface, control panel, or another piece of furniture.
- Step on while the platform is stopped Place both feet securely on the textured standing area. Keep the control panel unobstructed, distribute your weight evenly, stand tall, and maintain a small bend in your knees.
- Begin with a low, comfortable setting Use the control panel or remote according to the manual. Start at the lower end of the available range or use an appropriate beginner preset. Increase only if you can remain relaxed and stable.
- Stop the platform before stepping off End the session if your posture deteriorates or you feel uncomfortable. Wait for the platform to stop completely, then step onto the floor carefully.

Hophorse vibration plate manual and quick-start help
The official Hophorse Whole Body Vibration Plate, model HL-VIBE-ST, currently lists 180 speed levels, five preset modes, a remote control, two resistance bands, a power cord, and a printed user manual. Other Hophorse models may use different controls or specifications.
Use the manual for your exact model instead of assuming that one Hophorse control panel works exactly like another.
View the Hophorse Vibration Plate ManualWhat the common controls do
Button names and program behavior vary, but many home vibration plates include the following controls. Confirm each function in your model’s manual before use.
| Control | Typical purpose | Beginner guidance |
|---|---|---|
| Power or Start/Stop | Turns the unit on, begins the session, pauses it, or stops it. | Know how to stop the machine before beginning. |
| Program or Mode | Selects manual operation or an automatic preset program. | Do not assume that every preset is designed for beginners. |
| Speed + / − | Raises or lowers the vibration level during compatible modes. | Make small changes and check your posture after each change. |
| Time | Displays or adjusts the session timer when the model permits it. | Keep the first sessions short even if a longer time is available. |
| Remote control | Allows adjustments without repeatedly bending toward the panel. | Keep the remote within reach, but avoid pressing buttons accidentally. |
Manual mode versus preset programs
Manual mode generally gives you more direct control over the vibration level. Preset programs may change the vibration pattern automatically. Because program sequences differ by model, use the manual rather than assigning the same purpose or intensity to every P1–P5 program.

How does a vibration plate work?
A vibration plate creates repeated platform movement. While you stand or perform controlled exercises, your body makes small muscular adjustments to maintain posture and stability. Changing your stance, exercise, and setting changes how the session feels.
Vibration training is different from walking, running, or lifting weights. It can add another type of movement to a home routine, but it should not automatically be treated as a replacement for aerobic activity, strength training, or everyday walking.
The experience also varies by machine. Platform movement, speed range, amplitude, program design, foot position, and body posture can all affect the session. That is why a setting used on one model should not be copied blindly to another.
How should you stand on a vibration plate?
For basic standing, place both feet securely on the textured area, keep your weight balanced, stand tall, and maintain a slight bend in your knees. Avoid standing rigidly with locked joints.
- Keep your head, shoulders, and hips in a comfortable upright position.
- Distribute your weight evenly across both feet.
- Keep the knees soft instead of completely straight.
- Engage the core gently without holding your breath.
- Keep the control panel and platform edges unobstructed.
- Use stable support nearby if balance is a concern.
Where should your feet go?
Start near the center of the usable standing area or follow the foot-position markings supplied with your model. On many oscillating plates, a wider stance can feel more pronounced than a narrower stance, but the exact effect depends on the machine.
| Position | How it may feel | Beginner note |
|---|---|---|
| Comfortable centered stance | Balanced and easier to control | Use this as the first position unless the manual says otherwise. |
| Slightly wider stance | May feel more pronounced on some oscillating models | Move outward gradually and keep both feet fully supported. |
| Shallow knee bend | Adds lower-body engagement | Use a small range and avoid a deep squat at first. |
| Single foot or lunge position | Requires more balance and control | Not necessary for a first session; use support if appropriate. |
For a more detailed position guide, see the best vibration plate positions for beginners .
Should you wear shoes on a vibration plate?
Follow the manufacturer’s instructions for your model. Flat, supportive athletic shoes may help some beginners feel more stable. Barefoot use may feel different and should only be considered when the manual permits it and the platform is clean, dry, and comfortable.
Avoid loose slippers or ordinary socks that reduce traction. Whatever you wear, make sure both feet remain secure on the standing surface.

What vibration plate level should beginners use?
Start at the lower end of the range available on your model. The right beginner level is one that lets you stand comfortably, breathe normally, and maintain steady posture without bouncing or tensing your whole body.
The Hophorse HL-VIBE-ST currently lists a range of 1–180 speed levels. That does not mean beginners need to progress toward 180, and it does not create a universal conversion between its levels and another machine’s levels.
Do not use a generic Hz recommendation
If your control panel displays numbered levels rather than frequency in hertz, a recommendation such as “use 15–25 Hz” cannot be applied directly. Use the numbered settings and guidance provided for your model.
A simple progression rule
| Stage | What to do | When to progress |
|---|---|---|
| First sessions | Use a low setting and practice comfortable standing for 5–10 minutes or less. | Progress only when you remain stable and comfortable. |
| Basic movement | Add small knee bends, gentle weight shifts, or slow calf raises. | Progress when each movement remains controlled. |
| More active routine | Add light resistance-band movements or a slightly more challenging setting. | Increase one variable at a time—not speed, time, and exercise difficulty together. |
Reduce the setting or stop if your knees lock, your heels repeatedly lose contact, your upper body shakes excessively, or you cannot maintain balance.
A practical 10-minute vibration plate routine for beginners
This routine is a general example, not a replacement for the instructions supplied with your machine. Use the plate on a hard, level floor and keep the setting comfortable.
- Minutes 0–2: Comfortable standing Stand with both feet secure, knees softly bent, shoulders relaxed, and weight evenly distributed.
- Minutes 2–4: Gentle weight shifts or small knee bends Move slowly through a shallow range. Return to basic standing if you feel unsteady.
- Minutes 4–6: Slow calf raises Lift and lower the heels with control. Hold stable support if appropriate, or skip this movement if balance is uncertain.
- Minutes 6–8: Optional resistance-band pulls Use only the designated attachment points. Keep the elbows and shoulders controlled instead of using fast momentum.
- Minutes 8–10: Easy standing finish Return to a comfortable stance, lower the setting if needed, breathe normally, and wait for the platform to stop before stepping off.
Standing alone is enough for learning the machine. You do not need to perform squats, lunges, planks, or push-ups during the first session.
When you are ready for a more structured workout, follow this 10-minute vibration plate workout plan .

How long and how often should you use a vibration plate?
Many beginners start with 5–10 minutes at a lower setting. A short session makes it easier to observe how you respond without increasing time and intensity too quickly.
Rather than assuming daily use is appropriate for everyone, begin with a few short sessions per week and allow time between sessions when needed. Increase frequency only if you remain comfortable and your product instructions permit it.
- First session: 5 minutes may be enough to learn the sensation and controls.
- Early routine: 5–10 minutes at a comfortable setting.
- Progression: increase time or difficulty gradually, one variable at a time.
- Stop early: end the session if posture, balance, or comfort declines.
Session needs vary by model, setting, exercises, experience, and individual health. For a more detailed breakdown, read how long you should use a vibration plate .
Beginner-friendly vibration plate exercises
Once basic standing feels stable, you can gradually introduce a few controlled movements. More exercises are not automatically better.
| Exercise | How to perform it | Beginner note |
|---|---|---|
| Basic standing | Stand tall with both feet secure and knees slightly bent. | Best place to begin. |
| Small knee bends | Bend and straighten the knees through a shallow, controlled range. | Avoid deep or fast squats at first. |
| Calf raises | Lift and lower the heels slowly while maintaining balance. | Use support or skip the exercise if needed. |
| Resistance-band pulls | Use slow curls, rows, or front raises with the bands correctly attached. | Avoid jerking the handles or leaning backward. |
| Supported shallow squat | Lower the hips slightly while keeping the chest upright. | Try only after basic standing feels comfortable. |
Lunges, planks, push-ups, and single-leg positions require more control and are not necessary for beginners. Progress according to your ability rather than copying an advanced routine.
Common vibration plate mistakes to avoid
- Starting at a high setting: more vibration is not automatically more useful.
- Locking the knees: maintain a small, comfortable bend during standing positions.
- Using an unstable surface: place the unit on a hard, dry, level floor.
- Making the first session too long: start with a shorter session and assess your response.
- Changing several variables at once: increase time, setting, or exercise difficulty separately.
- Attaching bands incorrectly: use only the manufacturer-designated connection points.
- Stepping off while the plate is moving: wait until it has completely stopped.
- Ignoring discomfort: stop instead of trying to push through dizziness, pain, or instability.
- Treating it as a complete exercise replacement: combine it with suitable walking, strength, mobility, and other activity.
Basic Hophorse vibration plate troubleshooting
Use the official manual first. The checks below are general and should not replace model-specific instructions or customer support.
| Issue | What to check | Next step |
|---|---|---|
| The plate does not power on | Check the power cord, outlet, main power switch, and control-panel instructions. | Stop using the unit if the cord is damaged; consult the manual or support. |
| The remote does not respond | Check the battery, protective battery tab, distance, direction, and whether the machine is in the correct operating state. | Try the onboard controls and follow the remote instructions in the manual. |
| The machine moves or sounds unusually loud | Confirm the floor is hard and level and that all base feet contact the surface evenly. | Stop and reposition the unit before continuing. |
| A program or level will not change | Some controls may be unavailable during a preset program or while the platform is running. | Return to standby and check the program instructions for your model. |
| The setting feels uncomfortable | Check your foot placement, knee position, stance width, and selected level. | Lower the setting or stop the session. |
Need help with your Hophorse vibration plate?
Review the official product information, included accessories, current specifications, and manual before starting.
View Hophorse Setup and Product Details
Choosing a vibration plate for home use
A beginner-friendly machine should be easy to set up, stable underfoot, clearly labeled, and practical for the space where you plan to use it.
- A textured, non-slip standing area
- A stable base designed for hard, level flooring
- Clearly labeled controls and an accessible stop function
- Adjustable settings that allow a gradual start
- A manual for the exact model
- A remote control if bending toward the panel is inconvenient
- Designated attachment points if resistance bands are included
- Dimensions and listed capacity appropriate for the user and home
The Hophorse Whole Body Vibration Plate currently includes 180 speed levels, five preset modes, two resistance bands, a remote control, power cord, and user manual. Compare its dimensions and specifications with other models before choosing.
Compare Hophorse vibration plates
Review platform size, controls, speed range, included accessories, and listed capacity across the current Hophorse lineup.
Compare Hophorse ModelsThe bottom line
The best way to use a vibration plate is to begin with a stable setup, a low setting, secure foot placement, softly bent knees, and a short session. Learn how the machine feels before adding more time, speed, or exercise difficulty.
Use your model’s manual as the primary source for its controls and programs. A vibration plate can complement a home movement routine, but it does not need to replace walking, strength training, or other suitable activity to be useful.
Start with control rather than intensity. A short session you can repeat comfortably is more practical than chasing the highest setting during your first week.
Frequently asked questions
How do beginners use a vibration plate?
Place the machine on a hard, level floor, step onto it while it is stopped, keep both feet secure and your knees slightly bent, and begin with a low setting. Start with 5–10 minutes or less and add exercises only after basic standing feels stable.
What setting should I use on a vibration plate?
Start at the lower end of the range provided by your model. Use a setting that allows you to remain upright, relaxed, and stable. Numbered speed levels cannot be reliably converted between different machines.
How long should a beginner stand on a vibration plate?
Many beginners start with a short 5–10 minute session. A first session can be shorter if needed. Follow the manual and stop early if your balance, posture, or comfort declines.
Should your knees be bent on a vibration plate?
Keep a slight, comfortable bend in the knees rather than locking them completely straight. You do not need to hold a deep squat; the goal is a stable, relaxed stance.
Where should your feet be placed on a vibration plate?
Begin with both feet securely positioned on the usable textured area or follow the foot markings in your model’s manual. Keep the control panel clear and adjust stance width gradually.
Do you wear shoes on a vibration plate?
Follow the manufacturer’s instructions. Supportive athletic shoes may help some beginners feel stable. If barefoot use is permitted, make sure the platform and feet are clean and dry. Avoid loose slippers or slippery socks.
Can you just stand on a vibration plate?
Yes. Comfortable standing is a practical way to learn the machine. Controlled exercises can be added later, but they are not required during the first session.
Should I use manual mode or a preset vibration program?
Manual mode may give you more direct control over the level, while preset programs may change the vibration pattern automatically. Because programs vary by model, check the manual before selecting one.
Where can I find the Hophorse vibration plate manual?
The official manual for the Hophorse Whole Body Vibration Plate is available through the Hophorse product page and the Hophorse PDF user manual . Confirm that the manual matches your exact model before following its controls or program instructions.
Can you use a vibration plate every day?
Daily use is not automatically appropriate for everyone. Beginners can start with a few short sessions per week and increase gradually if they remain comfortable and their model instructions permit it.
Can a vibration plate replace walking or strength training?
No single vibration plate session reproduces every demand of walking, aerobic exercise, or progressive strength training. It is better used as one part of a broader movement routine.
Share:
What Is a Vibration Plate? A Complete Guide to a Vibration Plate
Do Vibration Plates Help You Lose Weight? A Clear, Science-Backed Guide